
Looking for a reliable way to permanently attach moldings, trim, or emblems to your vehicle without drilling or messy glue?
")
 on this page.")
Product overview
You’ll find the 3M Super-Strength Molding Tape, 1/2 in x 15 ft, High Strength Double-Sided Adhesive, Permanently Attaches Side Moldings, Trim and Emblems to Interior and Exterior of Vehicles (03614) is designed for long-lasting, weather-resistant bonding. This tape aims to replace rivets, screws, and liquid adhesives for many trim and molding jobs on cars, trucks, and even some industrial or household projects.
What this tape is meant to do
You can use this tape to permanently attach side moldings, trim, and emblems to both interior and exterior surfaces. It’s designed for metal-to-metal bonding as well as attaching to painted surfaces, plastics, and textured surfaces where a conformable adhesive is needed.

3M Super-Strength Molding Tape, 1/2 in x 15 ft, High Strength Double-Sided Adhesive, Permanently Attaches Side Moldings, Trim and Emblems to Interior and Exterior of Vehicles (03614)
Key features and why they matter
You should know the main strengths before applying it to critical surfaces. The features below summarize why people choose this product for vehicle and trim work.
- Permanent bond: The tape is formulated to create a long-lasting bond meant to replace mechanical fasteners in many applications. You’ll get a secure hold meant to last across seasons.
- Weatherable: The adhesive withstands exposure to sun, rain, salt, and road debris; it’s rated for harsh environments. That means you can trust it outside without worrying about quick failure from weather.
- Temperature range: Rated for use from -40°F to 250°F, so it holds in both cold winters and hot summers. This wide range keeps the bond stable through thermal cycles.
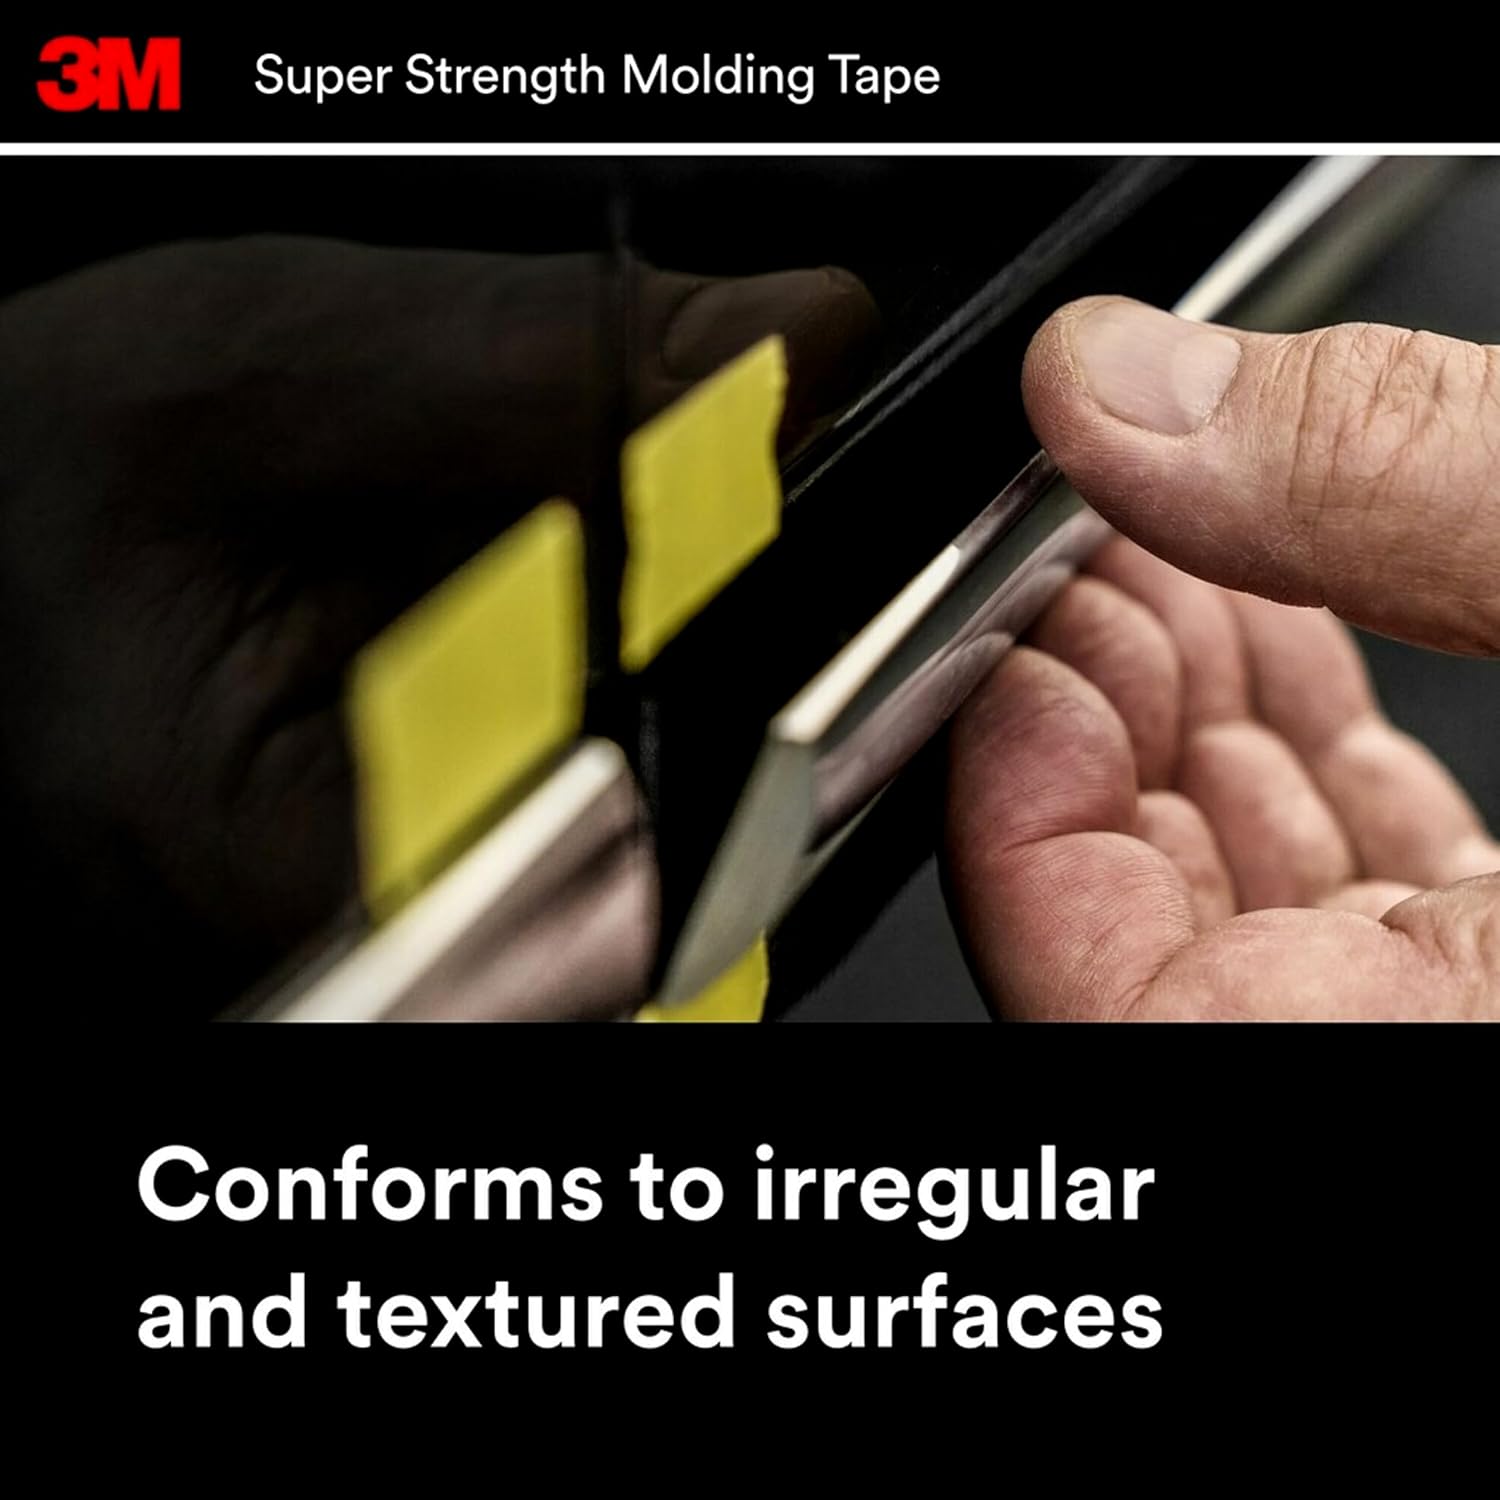
- Super conformable: The tape conforms to irregular or textured surfaces so you don’t end up with gaps that compromise adhesion. You can attach things to contoured trim and textured panels more successfully than with rigid adhesives.
- Easy to use: Cut to length, apply, and press — no special tools, messy liquids, or complicated curing steps. You’ll save time and avoid headaches that come with epoxy or liquid adhesives.
- Aircraft-grade strength: The formulation gives very high shear and peel strength that rivals rivets and screws for many applications. You get metal-to-metal bonding capability without the stress and surface penetration of fasteners.
Specifications at a glance
Below you’ll find the core specs you should check before buying or using the tape. These will help you decide if it’s right for the surfaces and parts you plan to attach.
| Specification | Detail | Why it matters |
|---|---|---|
| Tape size | 1/2 in x 15 ft | Long roll and narrow width: good for moldings and narrow trim strips |
| Adhesive type | High-strength double-sided VHB (Very High Bond) | Strong, permanent bonding performance |
| Temperature range | -40°F to 250°F (-40°C to 121°C) | Suitable for wide climate ranges and hot engine-bay exposure |
| Conformability | Super conformable for irregular/textured surfaces | Better contact on contoured trim and textured plastics |
| Intended use | Interior and exterior vehicle trim, moldings, emblems | Specifically formulated for automotive applications |
| Permanence | Permanently attaches trim; aircraft-grade adhesive strength | Aims to replace rivets/screws for many attachments |
| Application method | Cut, apply, press | Simple application without tools or liquids |
")
.")
First impressions: packaging and physical feel
When you open the package, you’ll notice the tape looks like a dense, slightly foam-like carrier with adhesive on both sides. The carrier gives it thickness and compressibility so it fills gaps and conforms to uneven surfaces, and the adhesive releases with a peel strip that’s easy to remove.
Unwrapping and handling
You’ll appreciate that the roll is compact and easy to store, and the peel liner peels away cleanly. The tape’s tack is strong but not immediately messy, so you can position pieces before firm pressure sets the bond.
How the tape works
You’ll want to know how the tape achieves such strong bonds. It uses VHB (Very High Bond) acrylic adhesive technology that flows slightly when compressed to make intimate contact across microscopic surface irregularities.
Adhesion mechanics
When you press the tape into place, the adhesive conforms to the surface topography and then chemically and physically bonds to the substrate. The thicker carrier allows some squeeze-out, which means the tape fills gaps between uneven surfaces and produces more consistent contact.
Surface compatibility and limitations
You’ll get a reliable bond on many materials, but not every substrate is ideal. Best results appear on painted metals, primed plastics, ABS, and many interior surfaces. Porous or oily surfaces are problematic.
Surfaces that work well
You can expect strong bonds on:
- Painted steel or aluminum
- Smooth plastic trim pieces
- Glass and ceramic trim accents
- Most automotive interior panels
Surfaces to be cautious with
You should avoid or test before use on:
- Low-energy plastics (e.g., some polyethylene, polypropylene) unless pre-treated
- Porous or chalky paint finishes
- Oily or contaminated surfaces
- Freshly painted surfaces that haven’t fully cured
- Flexible, heavily bending parts where shear loads will be high
")
Preparation and application: step-by-step
You’ll get the best results if you spend a little time prepping surfaces and following a consistent application routine. Here’s a recommended step-by-step process.
Tools and materials you’ll need
You don’t need special tools, but these items will make the job easier: isopropyl alcohol (70–90%), lint-free cloths, measuring tape, scissors or a razor blade, a plastic applicator or roller for pressure, and optionally a heat gun for cold weather.
Surface preparation
Clean the surfaces thoroughly with isopropyl alcohol and let them dry completely. You should remove wax, grease, dirt, and silicone residues so the adhesive can bond directly to the substrate.
Temperature considerations for application
Apply the tape at room temperature when possible, ideally between 60°F and 80°F. If it’s cold, briefly warm the surfaces with a heat gun or hairdryer to improve adhesion during application. If it’s very hot, cool the surface or apply when temperatures are milder to avoid overly rapid tack that can trap bumps.
Cutting and positioning
Measure and cut the tape to length, remove the liner from one side, and position the tape on the trim or molding first. Stick the tape to the trim, then peel the remaining liner and align the assembly against the vehicle panel.
Final bonding
Once everything is aligned, press firmly along the entire length for 30–60 seconds using a roller or strong hand pressure. For maximum bond strength, apply firm pressure and, if needed, use a clamp or tape to hold parts in place for several hours or overnight depending on the load and environmental conditions.
Performance over time
You’ll want to know whether the tape holds up across seasons and stress. With proper preparation and application, the tape maintains adhesion across a wide temperature range and resists weathering, road salts, and UV exposure.
Long-term durability
Because the adhesive is formulated to be weatherable and aircraft-grade, you should see long-term adhesion without creep or edge lift in most normal automotive uses. Regular exposure to rough impacts or constant flexing may reduce lifetime in some edge cases.
Real-world applications and use cases
You’ll find many practical uses for this tape beyond just side moldings. It’s versatile for automotive, marine, and even household trim projects where a strong, permanent bond is preferred.
Automotive uses
Common automotive jobs include:
- Attaching side moldings and rocker panel trim
- Mounting emblems and badges
- Securing small exterior trim pieces and plastic accents
- Fixing interior trim panels, switch bezels, and decorative strips
Other uses
You can also use it for:
- Marine trim (on non-submerged areas) where salt and weather resistance help
- Household trim where you don’t want visible fasteners
- Fabrication tasks where a clean finish without mechanical fasteners is desirable
")
Strength testing and load capability
You’ll want to know how much load this tape can actually handle. While manufacturers don’t always publish explicit pound-for-pound ratings for every substrate, VHB-style tapes generally have very high shear strength and strong peel resistance when correctly applied.
Shear vs. peel
The tape performs best when loads are applied as shear (parallel to the bonded plane). You’ll get the strongest long-term results with shear loading. Peel loads (lifting at the edge) place more stress on the adhesive and can lead to edge failure, so consider mechanical relief or additional adhesive if peel is unavoidable.
Pros and cons
You’ll want a balanced view before committing to using this tape for a big job. Here are the typical strengths and weaknesses.
Pros
- High strength, permanent bonding suitable for many automotive trims.
- Weatherable across a wide temperature range (-40°F to 250°F).
- Conforms to irregular and textured surfaces for better contact.
- Easy, clean application—cut, apply, press—no curing liquids or messy epoxies.
- Can replace rivets/screws in many use cases, leaving a cleaner appearance.
Cons
- Not ideal for low-energy plastics unless surface-treated.
- Permanent bond can make future removal difficult and may damage delicate paint if removed poorly.
- Performance is sensitive to surface prep—oils, waxes, or insufficient cleaning compromise adhesion.
- Peel loads and repeated flexing can challenge the bond over time.
Troubleshooting common problems
You’ll run into issues rarely if you follow prep and application steps, but when they happen, these tips should help.
Tape won’t stick or lifts at the edges
If you see edge lift soon after application, check that the surface was clean and dry. Reapply after cleaning with isopropyl alcohol and warming surfaces slightly to improve tack. For difficult plastics, consider a primer or adhesion promoter.
Bond weakens in cold weather
If you applied in very cold conditions, the tape might appear less tacky initially. Warm the assembly to room temperature and press firmly; allow the adhesive time to flow and set. If temperature extremes are expected, use mechanical backups temporarily during full cure.
Visible seams or gaps after application
If the tape doesn’t fully compress due to gaps or surface irregularities, remove the part and reapply with additional pressure or use a thicker tape if available. Ensure you’re using the right width and enough surface contact area.
")
Removal advice and repair options
You’ll sometimes need to remove old tape or replace trim. Removal can be done without severe damage if you follow recommended techniques, but take care with paint.
Removal steps
- Warm the tape with a heat gun or hairdryer to soften the adhesive.
- Use a thin fishing line, dental floss, or plastic scraper to work the tape away gradually.
- Residual adhesive can be removed with an adhesive remover or isopropyl alcohol; avoid aggressive solvents that can ruin paint.
- If paint lifts, stop and consider professional help to repair or refinish the affected area.
Repairing after removal
Once the surface is clean, repair any paint or substrate damage before applying new tape. New paint should be fully cured per the paint manufacturer’s recommendations to ensure adhesion.
Tips and best practices
You’ll benefit from a few practical habits that improve longevity and ease of use.
- Always clean with isopropyl alcohol and allow full drying before application.
- Apply in moderate temperatures or warm the surface for best adhesive flow.
- Use a roller or firm, even pressure along the entire bond line.
- Increase surface area of the tape for heavy parts—more adhesive area equals more strength.
- Avoid applying to newly painted surfaces until paint is fully cured.
- For low-energy plastics, use an adhesion promoter or primer recommended for acrylic VHB tapes.
Safety and environmental considerations
You should use the tape in well-ventilated areas when cleaning solvents are involved and dispose of used liners and tape responsibly.
Handling safety
The tape itself poses low hazard during normal use; handle blades and cutters with care, and use gloves if you prefer to avoid direct contact with adhesive. Keep away from open flame when working with heat guns.
Environmental notes
The adhesive is permanent and not biodegradable. Dispose of excess tape and liners according to local waste guidelines. Consider reuse or recycling of packaging where available.
Comparison to alternatives
You’ll often weigh tape against screws, rivets, or liquid adhesives. Here’s how the tape stacks up.
Tape vs. screws/rivets
Tape gives a cleaner look and avoids drilling holes that can rust or let water in. Screws and rivets provide mechanical security and are easier to remove or adjust; they are preferable for structural attachments or heavily stressed parts.
Tape vs. liquid adhesives (epoxy, silicone)
Tape is cleaner, faster, and doesn’t require mixing or clamping, while epoxy can sometimes give higher strength in certain load configurations but is messy and harder to reverse. Silicone can be flexible but often lacks the high shear strength of VHB tape.
Cost effectiveness
You’ll find the cost per foot of this 1/2 in x 15 ft tape is competitive with similar automotive-grade tapes. Considering it can replace screws and reduce labor (no drilling, less finishing), it’s often cost-effective for trim work.
Value for money
Because the tape performs reliably in many conditions and is easy to apply, you may save time and avoid costly paint damage or corrosion from drilled holes. The upfront cost is reasonable given the durability and convenience.
Frequently asked questions (FAQs)
You’ll probably have questions. Below are answers to common ones users ask.
Can I use this tape on unpainted metal?
Yes, but ensure the metal is clean and free of oils or mill scale. For best results, use a clean, primed, or painted surface.
Will it damage my paint when removed?
Improper removal can damage paint. Warm the tape first and remove slowly; use adhesive removers and gentle techniques. For delicate finishes, consider consulting a professional.
Is the bond instant?
You’ll get immediate handling strength after firm pressure, but full strength develops over time as the adhesive flows and cures. Allow up to 72 hours for maximum bond in many cases.
Can I use it on car bumpers?
Yes for non-structural trim, but be mindful of flexible bumper areas that move frequently; repeated bending can stress the bond. Increase bonding area or combine methods for high-stress applications.
Does it stick to ABS plastics?
Generally yes, but adhesion depends on plastic formulation and surface condition. Test a small area first or use a primer for low-energy plastics.
Real user scenarios and examples
You’ll find these typical user stories useful when considering the tape for your projects.
- Attaching chrome trim to door panels where drilling wasn’t an option; the tape held through winter and several car washes.
- Replacing a missing emblem on a hood — easy application and the emblem stayed secure for years.
- Repairing interior trim panels where screws would be visible; the tape preserved interior aesthetics and felt sturdy.
Alternatives and complementary products
You’ll sometimes combine this tape with other products for best results. Consider these options.
- Adhesion promoters/primers: Improve bond on difficult plastics.
- Heat gun: Helps in cold weather and assists in controlled removal if needed.
- Trim clips or backing plates: Provide mechanical backup on heavy items or when peel loads are significant.
- Wider or thicker VHB tapes: For larger gaps or heavier trim.
Final verdict
You’ll find the 3M Super-Strength Molding Tape (03614) a highly practical, durable, and user-friendly solution for attaching vehicle moldings, trim, and emblems without hardware or messy adhesives. When you prepare surfaces properly and apply it under appropriate conditions, it delivers a permanent, weather-resistant bond that often replaces screws and rivets for cosmetic and many functional attachments.
Who should buy this
If you want a clean-looking installation, resist drilling into bodywork, and prefer a product made specifically for automotive environments, this tape is a strong choice. Professional installers and DIYers who follow best practices will get the most reliable results.
Final recommendation
You should consider this tape for trim and emblem work where shear loads dominate and surfaces are compatible. Keep in mind the permanence of the bond and take precautions for removal to avoid paint damage if repositioning or replacement may be required later.
If you’d like, you can tell me what project you have in mind and the materials involved, and I’ll help you decide whether this tape is the best choice and walk you through the exact steps for applying it successfully.
Disclosure: As an Amazon Associate, I earn from qualifying purchases.